OPSMAPIA Functionality
OPSMAPIA is an advanced but simple to use global mapping tool for domestic or International applications. Users can create their own unique structure determined by their operational needs using customizable, Dynamic/Static Spots and share critical information
How does it work?
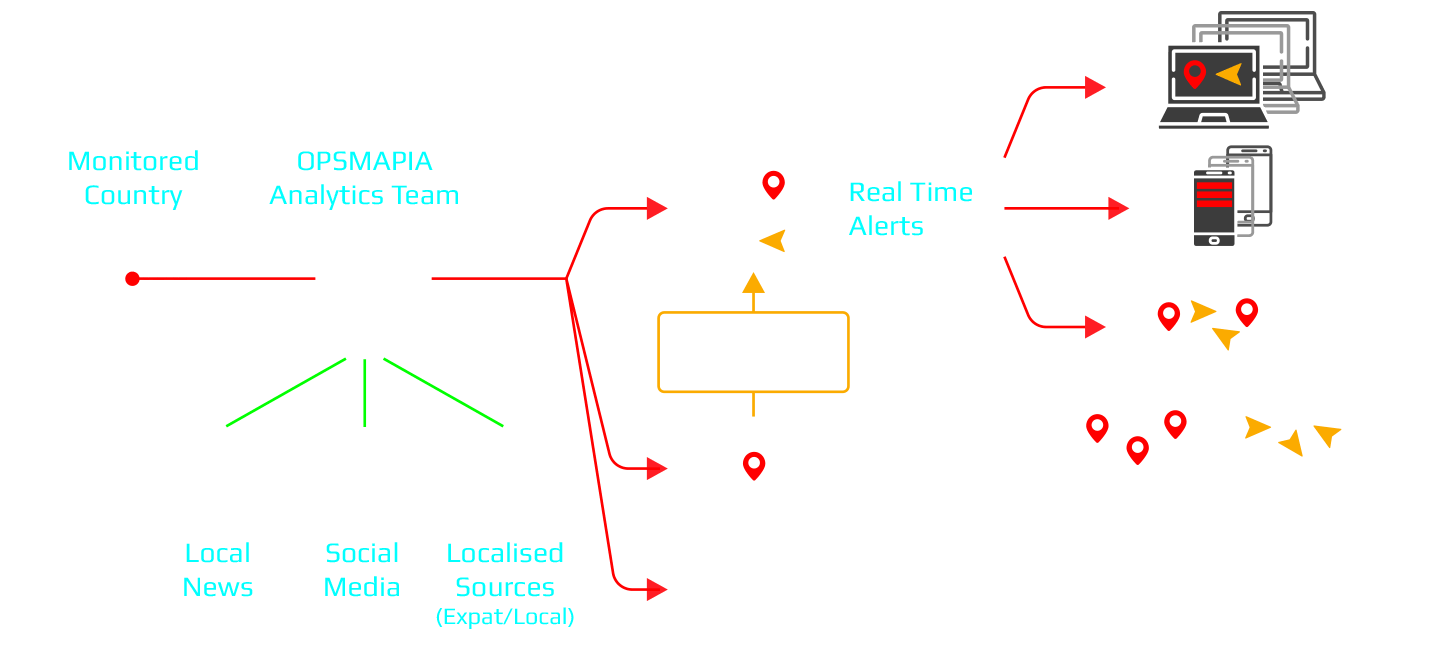
OPSMAPIA is a living, real time application that allows you to plot incidents, locations or assets and much more:
- Simple and easy to use web application ready to use the moment you log in.
- Build your own categories, groups and types of spots.
- Dynamic time based and static spots.
- Overlay areas of interest and out of bounds areas.
- Plot your significant projects, safe havens and other areas of interest, attach images and reference files to each of them.
- Easy to use search tools by, Lat-Long, MGRS or Street address.
- Simple measuring tools which can instantly determine distance or where an overlay has been created provide the area (i.e. search area) at the touch of a button.
Users can not only add spots and overlays:
- Each user logged into your system gets Real-Time updates with the ability to collaborate and enhance the information if the user has the appropriate permissions.
- Each Real-Time update is sent both visually and audibly to all users.
- Users can instantly upload information, images, websites and pdf documents to every spot.
- For example; a user can include the security and evacuation plans of safe havens.
- Users can generate a visual report for any of the time-based categories.
- Each user can choose their own area of interest and base map.
- Export high-quality images of your maps.
- All of your users can visualize exactly what’s happening on the ground all over the world allowing for tactical, operational and strategic decisions.
- The real time activity log registers every action taken by whom and at what time.
OPSMAPIA is highly customizable for your organization specific needs. If OPSMAPIA is found to not quite do what you want, speak to us and we can make subtle changes to suite your specific requirements
Introduction to the OPSMAPIA Web application
Let’s have a look around the OPSMAPIA web application and get to know some of the features.
By having a look about the web now you will become familiar with how to navigate and perform functions later. Move your cursor around the screen and as you move over any of the icons and they change colour to orange. That change in colour identifies that the item is active and that a function can be performed by selecting that item. For example; move your cursor over the “Base Maps” icon and left click. A selection of base maps will appear, select one by left clicking it and the appearance of the operating map for the main screen will change to that selected. To return to the original Base Map simply repeat the process and select the original style Base map.
Some of the other functions available on the web include:
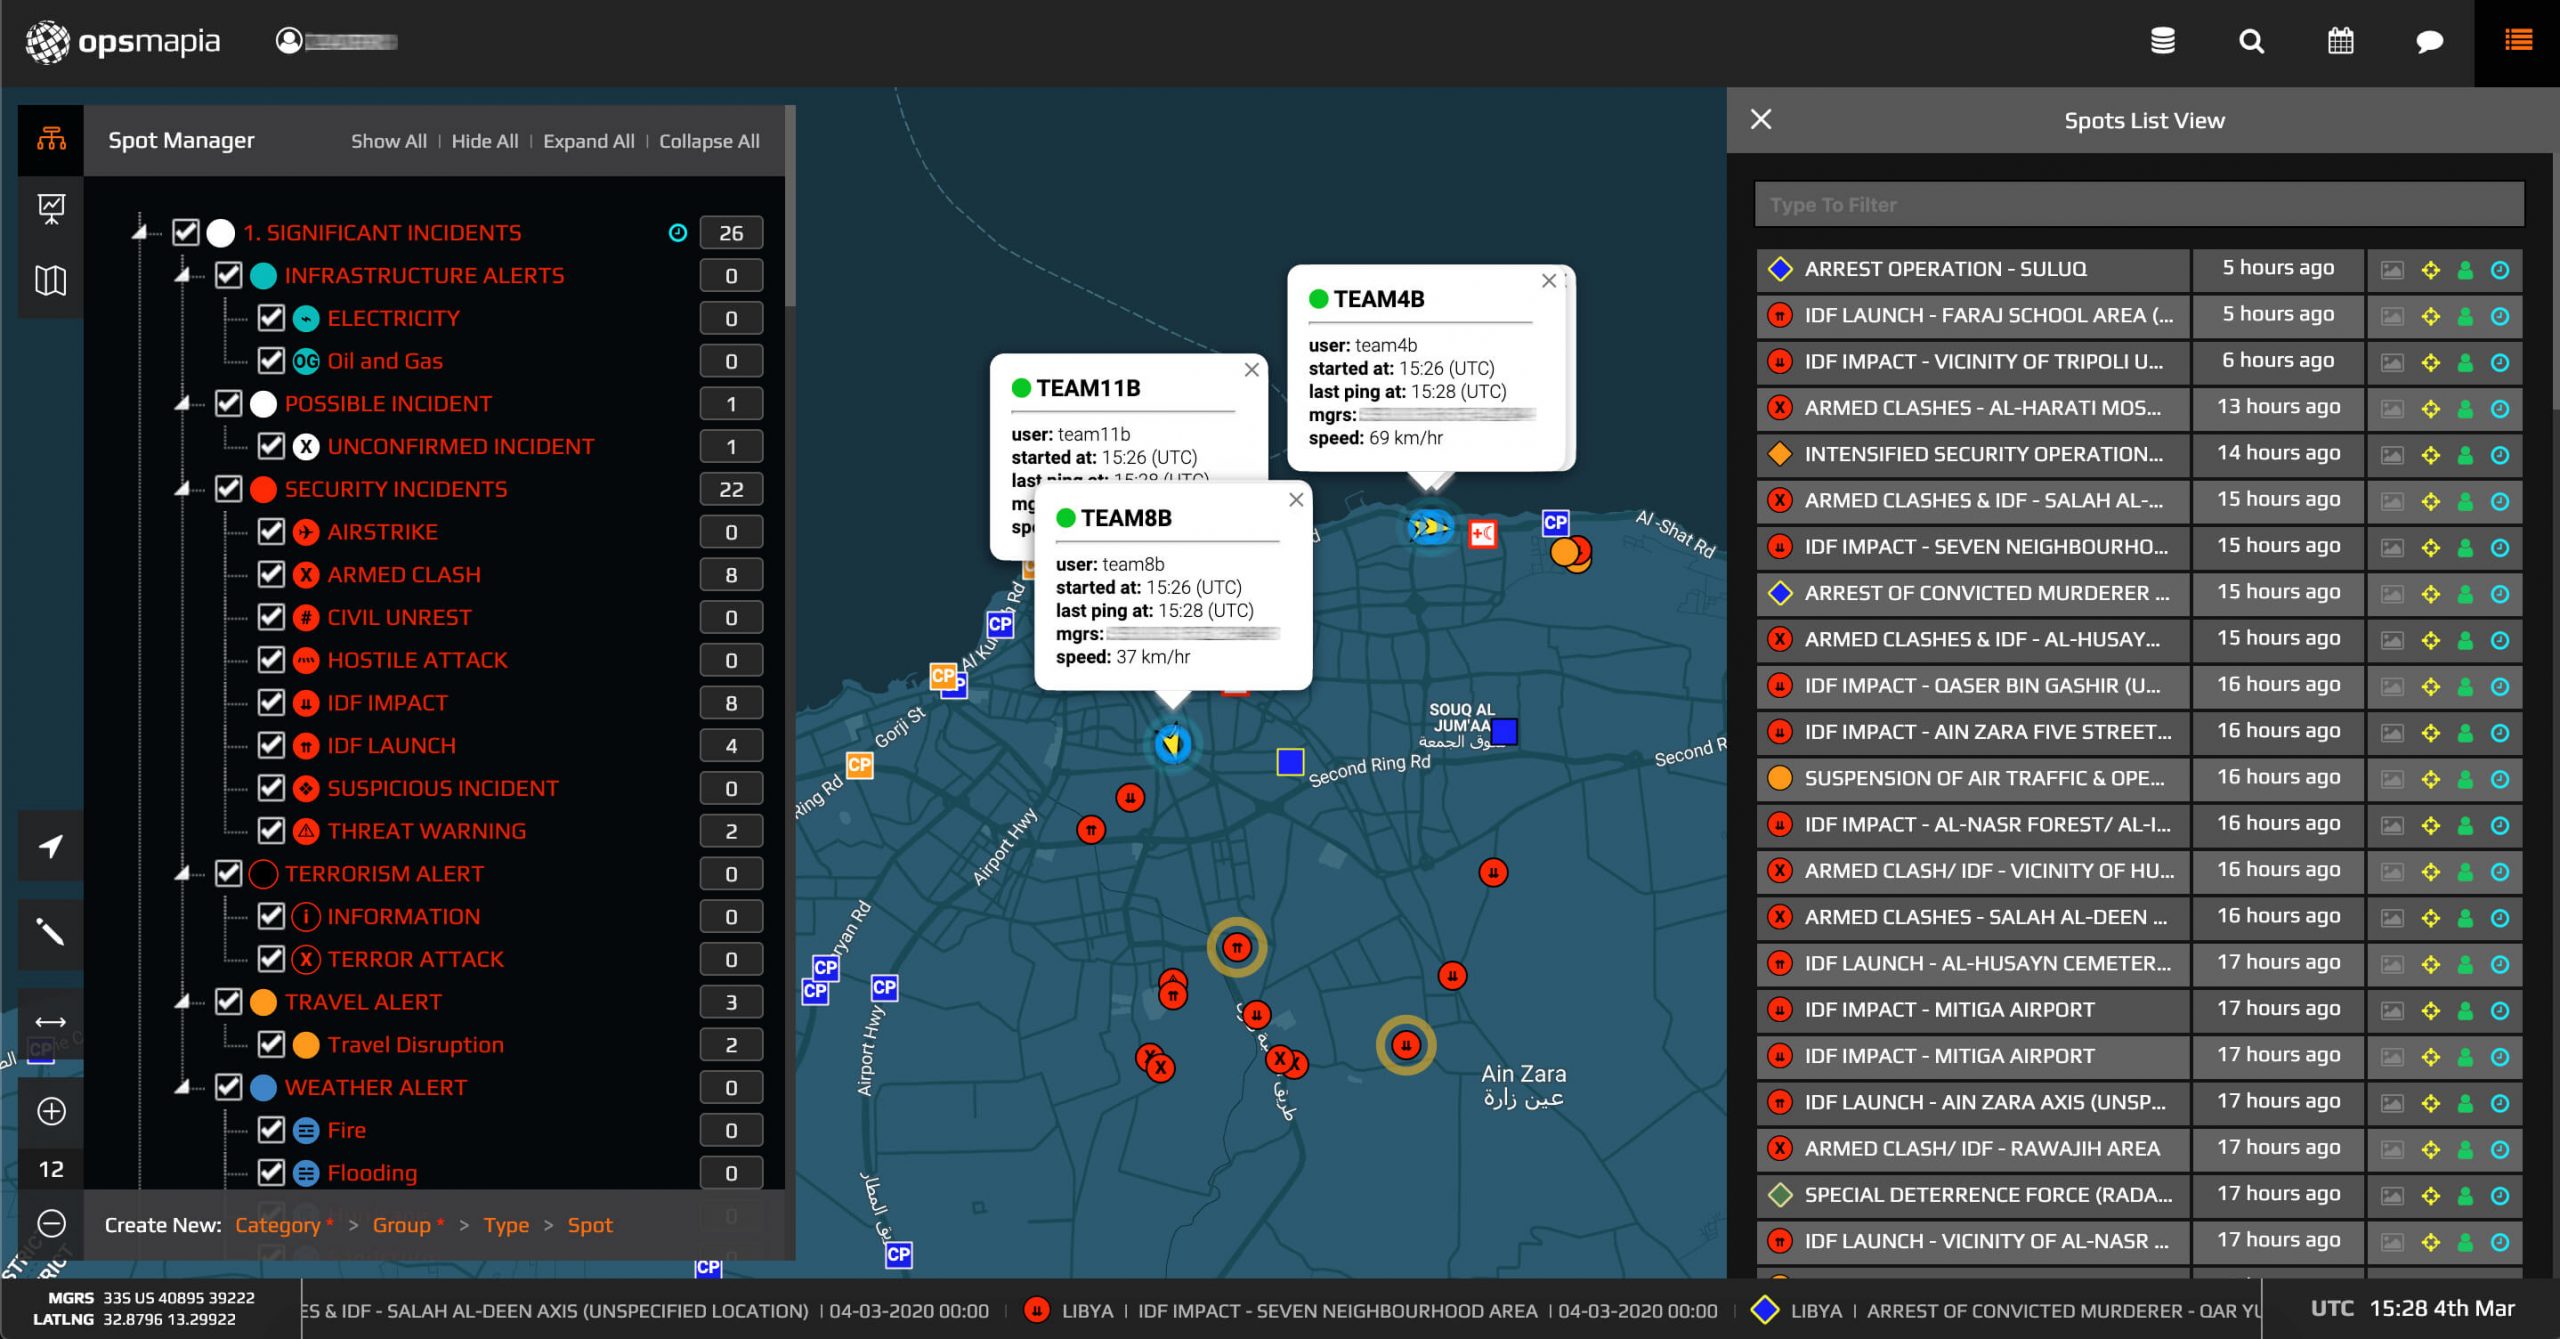
- Spot Manager – Create new Spot – Show all / Hide all Spots.
- Overlay Manager – Generate Overlays.
- Base Maps – Different style of Maps.
- Show Drawing Tools – Draw function over the Maps.
- Start Measuring Tool – Measure distances between points on the Map.
- My Current Location – You location.
- Zoom in and out function for Mapping – Increase/decrease details of Map.
- Search options by Lat Long Coordinates / MGRS coordinates / Location Name.
- View Spots by Date range – Discriminate Spots by Date Range.
- Spots List View – View all Spots created in system history.
- Other functions: My profile – Settings – Activity – Export Map – Export Spots.
- Active Ticker-tape at the bottom of the active screen.
- The active Ticker-tape across the bottom of the screen will only become visible after ten or more spots have been created.
Getting Started
Once you have received the application and a unique log-in you are ready to get started
Users can perform certain functions determined by pre-set permissions by your Administrator. See the table below.

OPSMAPIA is a hierarchical based operating system. Prior to generating a Spot on the map you will need to establish your Operational structure in the “Spot Manager” A spot can be created at either the Category, Group or Type level.
A hierarchical control system is a form of control system in which a set of devices and governing software is arranged in a hierarchical tree or pyramid like structure. When the links in the tree are implemented by a computer network, then that hierarchical control system is also a form of networked control system.
Following the principals of a hierarchical structure a user must first generate a Category before generating a Group (many) and a Group prior to generating a Type (many).
- Category – (Primary) (many) (free text)
- Group – (Secondary) (many) (free text)
- Type – (Tertiary) (many) (free text)
Let’s generate a Category by selecting the “Spot Manager” at the top left of the page (left click on mouse). When the drop down box appears you will see in orange at the bottom
Category + Group + Type +
Place your cursor over Category (text turns white) and left click your mouse
A new drop down box will appear on the right hand side of the screen.
Move your cursor to the empty line box at the top and left click inside that box. You can now create a name for the new Category (free text) Type in “Test Category 1”. When you have finished typing simply move your mouse out of the box and down to the Category Shape – Icon Options. Now select a Icon shape for your new Category Spot.
Once you have selected a new shape move your mouse down to the “Load Options” box and left click over the “Time Based” orange box.
Once selected move your cursor down and over the “Save” button and left click your mouse.
The system will acknowledge the creation of a new Category Spot by sounding a loud PING and highlighting a message across the header bar stating – New Category has been created
Let’s generate a Group by selecting the “Spot Manager” at the top left of the page (left click on mouse). When the drop down box appears you will see in orange at the bottom
Category + Group + Type +
Place your cursor over Group (text turns white) and left click your mouse
Repeat the above actions for Group (Let’s call it – Test Group 1) Remember that the new group MUST be associated to an existing Category so in the top box select “Test Category 1” now move your cursor to the Group box and enter your new Group Name “Test Group 1” and when complete select a fill colour for the new spot and when done press save.
The system will acknowledge the creation of a new Group Spot by sounding a loud PING and highlighting a message across the header stating – New Group has been created
Repeat the above actions for Type (Let’s call it – Test Type 1) by selecting “Type” at Spot Manager Box.
Remember you can generate as many Groups and Types associated to your new Category as you need. If you want to practice more perhaps create the next Group (Test Group 2) (Test Group 3) and (Test Type 2) (Test Type 3) etc.
Now when you return to the “Spot Manager” drop down box at the top left of the page, you will see that your new structure is being created with each new Category, Group and Type that you make.
- Test Category 1
- -Test Group 1
- -Test Group 2
- -Test Type 1
- -Test Type 2
Let’s now move to the main screen, “The world” and place your NEW spot somewhere.
Everyone knows where the Green Zone is in Baghdad. Let’s place the new spot there!
Locate Baghdad city using the mouse to move the map and either the scroll function on your mouse or the + / – feature at the bottom left of the screen to zoom in an out. Once you have located the Green Zone, hover you mouse over the Green Zone and when ready right click you mouse.
A new drop down box will appear on the right, move your cursor over the “Add New Spot” option and you will notice that it highlights to orange (left click) A new larger drop down box appears on the right hand side of the screen (you may need to scroll to the top of the new box)
Place your cursor over the “Select a Category” box and left click you mouse. A new drop down box will appear showing all Category Spots. Select “test category 1” by moving your cursor over it and left clicking.
Now place your cursor over the “Select a Group” box and left click your mouse. A new drop down box will appear showing all Group Spots. Select “test group 1” or “test group 2” and left click.
(You will notice at this level that only groups that you have created relative to the category appear)
Now do the same as above for select a “type” and when done you will need to give the new spot a title.
Move your mouse over the “Title” box and give your new spot a title. When done move your mouse over the “Description” box and enter some free text describing in detail your new spot.
You also have the option to import some other information if you please, these can be documents, photographs, or links. (Just drag the item from your computer into the “Drop Files” box. (Allow a couple of seconds for the transfer to occur – the time bar below your new item will let you know when done)
Now you are just about ready to save. To ensure that the item is created immediately and the unavoidable fact that this system uses UTC time settings. Move you mouse over the small orange clock on the right hand side of the page (about half way up) and select with a left click of your mouse.
Now move down to the Save button and left click
The system will alert you with a loud PING and your new spot will appear over the Green Zone. The new spot will pulse for preselected times letting everyone else on the system know that a new spot has been created. (spots glowing effect duration – User – Settings)
Now that you have successfully: Created a Category, Group, Type. Created a new Spot and located it on the earth, I suspect you could do that all again without these notes. “Have a go now with a new Category, Group, Type, Spot and location”
Remember – when you create more than 10 spots the active Ticker-Tape will show your time-based spots across the bottom of the screen.
Once the active Ticker-Tape starts, you can select a Spot by moving you mouse over the Ticker-Tape and left clicking the required Spot.